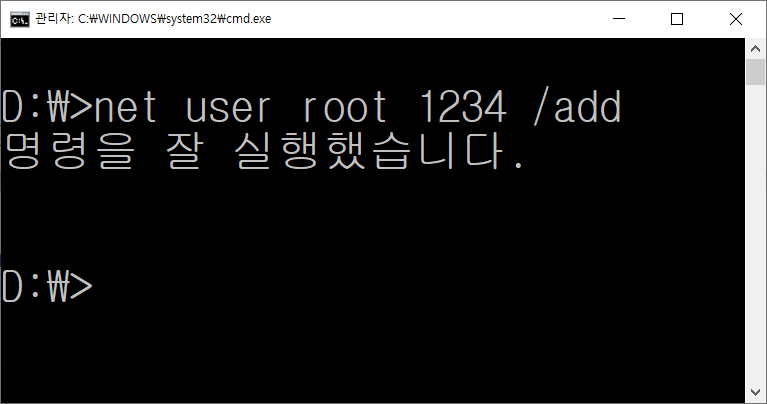
1. Windows10
[ SAMBA 서버 ]


[ 리눅스 클라이언트 - CentOS7 ]
yum -y install samba-client

# client, common 확인
rpm -qa | grep samba

# ipconfig로 확인한 윈도우 아이피 입력
SAMBA_SERVER_IP=192.168.1.30 # read SAMBA_SERVER_IP

smbclient -U=root%1234 -L ${SAMBA_SERVER_IP}

mkdir -p /app/mnt/share

mount -t cifs //${SAMBA_SERVER_IP}/samba /app/mnt/share -o rw,user=root,password=1234

df -Th

cat <<SAMBA_CLIENT_SETTING >> /etc/fstab
//${SAMBA_SERVER_IP}/samba$(printf '\t')/app/mnt/share$(printf '\t')cifs$(printf '\t')rw,user=root,password=1234$(printf '\t')0$(printf '\t')0
SAMBA_CLIENT_SETTING

# 에러메시지가 뜨지 않는 것 확인
# 재부팅하여 마운트가 유지되는 것 확인
mount -a
[ 리눅스 클라이언트 - Ubuntu20 ]
apt-get -y install samba-common smbclient cifs-utils

# client, common 확인
dpkg -l | grep -E "smb|samba"

# ipconfig로 확인한 윈도우 아이피 입력
SAMBA_SERVER_IP=192.168.1.30 # read SAMBA_SERVER_IP

smbclient -U=root%1234 -L ${SAMBA_SERVER_IP}

mkdir -p /app/mnt/share

mount -t cifs //${SAMBA_SERVER_IP}/samba /app/mnt/share -o rw,user=root,password=1234

df -Th

cat <<SAMBA_CLIENT_SETTING >> /etc/fstab
//${SAMBA_SERVER_IP}/samba$(printf '\t')/app/mnt/share$(printf '\t')cifs$(printf '\t')rw,user=root,password=1234$(printf '\t')0$(printf '\t')0
SAMBA_CLIENT_SETTING

# 에러메시지가 뜨지 않는 것 확인
# 재부팅하여 마운트가 유지되는 것 확인
mount -a
2. CentOS7
[ SAMBA 서버 ]
# samba server 설치
yum -y install samba

# samba 로그인으로 사용할 유저 추가
useradd user1

# samba 접속 사용자 추가
echo -e "P@ssw0rd"'!'"\nP@ssw0rd"'!' | smbpasswd -a user1

# samba 접속 사용자 추가
echo -e "P@ssw0rd"'!'"\nP@ssw0rd"'!' | smbpasswd -a root

# samba 접속 사용자 확인
smbstatus

# 공유폴더 생성
mkdir -p /app/share

chmod 777 /app/share

sed -i "s/workgroup.*/workgroup = WORKGROUP/g" /etc/samba/smb.conf

sed -i ''`grep -n "\[Shared\]" /etc/samba/smb.conf | awk -F ":" '{print $1}'`',$d' /etc/samba/smb.conf

cat <<SAMBA_SERVER_SETTING >> /etc/samba/smb.conf

[Shared]
$(printf '\t')comment = First Shared Folder
$(printf '\t')path = /app/share
$(printf '\t')public = yes
$(printf '\t')writable = yes
$(printf '\t')write list = user1 root
$(printf '\t')create mask = 0777
$(printf '\t')directory mask = 0777
SAMBA_SERVER_SETTING

# TCP 139 – TCP NetBIOS 세션, Windows 파일 및 프린터 공유(가장 안전하지 않은 포트)
# TCP 445 - Microsoft-DS Active Directory, Windows 공유
# UDP 137 – NetBIOS 이름 서비스(WINS)
# UDP 138 – NetBIOS 데이터그램
# UDP 445 - Microsoft-DS SMB 파일 공유
firewall-cmd --permanent --add-port=139/tcp --add-port=445/tcp --add-port=137-138/udp --add-port=445/udp

firewall-cmd --reload

firewall-cmd --list-ports

getsebool -a | grep samba

setsebool -P samba_create_home_dirs 1
setsebool -P samba_domain_controller 1
setsebool -P samba_enable_home_dirs 1
setsebool -P samba_export_all_ro 1
setsebool -P samba_export_all_rw 1
setsebool -P samba_load_libgfapi 1
setsebool -P samba_portmapper 1
setsebool -P samba_run_unconfined 1
setsebool -P samba_share_fusefs 1
setsebool -P samba_share_nfs 1
setsebool -P sanlock_use_samba 1
setsebool -P tmpreaper_use_samba 1
setsebool -P use_samba_home_dirs 1
setsebool -P virt_use_samba 1

systemctl restart smb
[ 리눅스 클라이언트 ]
yum -y install samba-client

# client, common 확인
rpm -qa | grep samba

SAMBA_SERVER_IP=192.168.108.50 # read SAMBA_SERVER_IP

smbclient -U=root%P@ssw0rd! -L ${SAMBA_SERVER_IP}

mkdir -p /app/mnt/share

mount -t cifs //${SAMBA_SERVER_IP}/Shared /app/mnt/share -o rw,user=user1,password=P@ssw0rd!

df -Th

cat <<SAMBA_CLIENT_SETTING >> /etc/fstab
//${SAMBA_SERVER_IP}/Shared$(printf '\t')/app/mnt/share$(printf '\t')cifs$(printf '\t')rw,user=user1,password=P@ssw0rd!$(printf '\t')0$(printf '\t')0
SAMBA_CLIENT_SETTING

# 에러메시지가 뜨지 않는 것 확인
# 재부팅하여 마운트가 유지되는 것 확인
mount -a
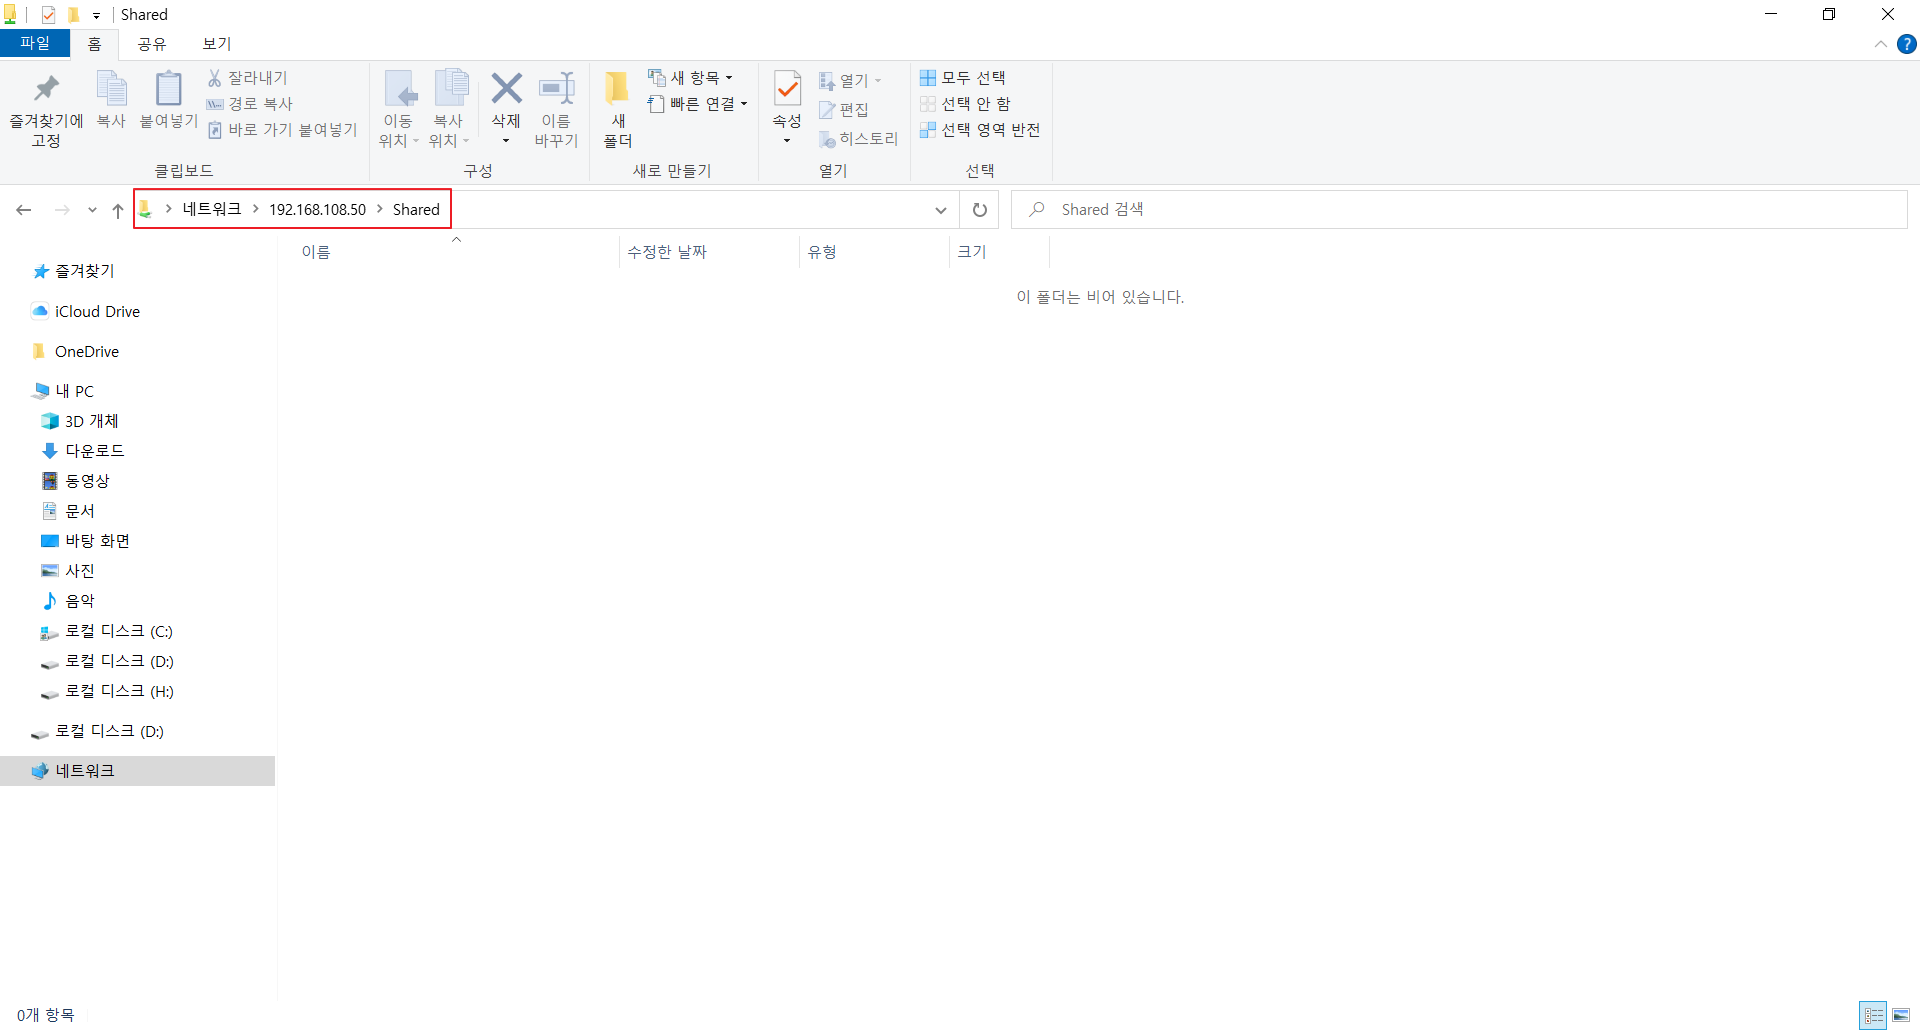
[ 윈도우 클라이언트 ]

3. Ubuntu20
[ SAMBA 서버 ]
# samba server 설치
apt-get -y install samba

# samba 로그인으로 사용할 유저 추가
useradd user1

# samba 접속 사용자 추가
echo -e "P@ssw0rd"'!'"\nP@ssw0rd"'!' | smbpasswd -a user1

# samba 접속 사용자 추가
echo -e "P@ssw0rd"'!'"\nP@ssw0rd"'!' | smbpasswd -a root

# samba 접속 사용자 확인
smbstatus

# 공유폴더 생성
mkdir -p /app/share

chmod 777 /app/share

sed -i "s/workgroup.*/workgroup = WORKGROUP/g" /etc/samba/smb.conf

sed -i ''`grep -n "\[Shared\]" /etc/samba/smb.conf | awk -F ":" '{print $1}'`',$d' /etc/samba/smb.conf

cat <<SAMBA_SERVER_SETTING >> /etc/samba/smb.conf

[Shared]
$(printf '\t')comment = First Shared Folder
$(printf '\t')path = /app/share
$(printf '\t')public = yes
$(printf '\t')writable = yes
$(printf '\t')write list = user1 root
$(printf '\t')create mask = 0777
$(printf '\t')directory mask = 0777
SAMBA_SERVER_SETTING

# TCP 139 – TCP NetBIOS 세션, Windows 파일 및 프린터 공유(가장 안전하지 않은 포트)
# TCP 445 - Microsoft-DS Active Directory, Windows 공유
# UDP 137 – NetBIOS 이름 서비스(WINS)
# UDP 138 – NetBIOS 데이터그램
# UDP 445 - Microsoft-DS SMB 파일 공유
ufw allow 139/tcp
ufw allow 445/tcp
ufw allow 137:138/udp
ufw allow 445/udp

ufw reload

ufw status

systemctl restart smbd
[ 리눅스 클라이언트 ]
apt-get -y install samba-common smbclient cifs-utils

# client, common 확인
dpkg -l | grep -E "smb|samba"

SAMBA_SERVER_IP=192.168.108.60 # read SAMBA_SERVER_IP

smbclient -U=root%P@ssw0rd! -L ${SAMBA_SERVER_IP}

mkdir -p /app/mnt/share

mount -t cifs //${SAMBA_SERVER_IP}/Shared /app/mnt/share -o rw,user=user1,password=P@ssw0rd!

df -Th

cat <<SAMBA_CLIENT_SETTING >> /etc/fstab
//${SAMBA_SERVER_IP}/Shared$(printf '\t')/app/mnt/share$(printf '\t')cifs$(printf '\t')rw,user=user1,password=P@ssw0rd!$(printf '\t')0$(printf '\t')0
SAMBA_CLIENT_SETTING

# 에러메시지가 뜨지 않는 것 확인
# 재부팅하여 마운트가 유지되는 것 확인
mount -a'Operating Systems > Linux' 카테고리의 다른 글
| [ Linux ] RAID 활용 ( 2 / 2 ) - Ubuntu20 (0) | 2021.10.18 |
|---|---|
| [ Linux ] RAID 활용 ( 1 / 2 ) - CentOS7 (0) | 2021.10.18 |
| [ Linux ] FTP 서버 설치 (0) | 2021.10.15 |
| [ Linux ] TFTP 서버 설치 (0) | 2021.10.15 |
| [ Linux ] Quota 활용 (0) | 2021.10.02 |


